
There are many tools you can use to spruce up your photo sessions, and a projector is one of the most versatile. A projector can act as a practical effect to directly add layers of real color and shine to your frame during the shoot instead of waiting till post-production.
While post-production editing may be able to get some of the same looks as a live projector, these often suffer from an uncanny valley effect where things look just a little off, making viewers slightly uncomfortable. Using a projector during the photoshoot can give you an array of in-camera effects to infuse your images with magic and realism that you can’t get from a photo-editing app.
Here are six fun ideas for how to use a projector in your photoshoots.
1. Enhance Your Lighting

At its most fundamental level, a projector is essentially a complex lighting tool. For that reason, when choosing which projector to use in your photoshoot, brighter is always better. The LED bulbs in today’s digital projectors generally last much longer than the lamps in older analog models, but the actual light output of those LED bulbs can often be quite low.
Digital projectors measure their brightness in lumens. The more lumens a model comes with, the more it tends to cost. A good rule of thumb is to invest in a projector with 3,500 lumens or more. A projector with at least 3,500 lumens will project images that you’ll be able to see clearly even when you use additional light sources. You’ll also be able to use lower ISO values and faster shutter speeds, which are crucial if you want to take action shots.
Even with a bright projector, the lighting in your room will depend a lot on what kind of images you project. Photos with plenty of light colors will give off more overall light, but if you want to use moody images with a lot of shadows, your light output will be low. To compensate for low light projections, make sure that the room you’re shooting in is completely dark. Any ambient light will dilute the projector’s image.
The great thing about lighting your photoshoot with a live digital projector is that it’s extremely easy to adjust almost any attribute of the projected image. Whether your projector is connected to your phone or laptop, it won’t take long to open your projected image in your favorite photo-editing app and tweak the brightness, contrast, or hue and then check how your edits look in real life.
If the image you want to use is exceptionally dark, there are two workarounds you can use. Mount your camera on a tripod, and try using slower and slower shutter speeds until your projected image exposes properly. Then position your model, and ask them to hold their poses for a bit longer than usual to avoid blur. Alternatively, if you need faster shutter speeds, you can raise your camera’s ISO a bit. That will give you brighter photos even in dark settings, but keep an eye on your images to make sure they don’t get too grainy or overexposed.
2. Find the Right Position
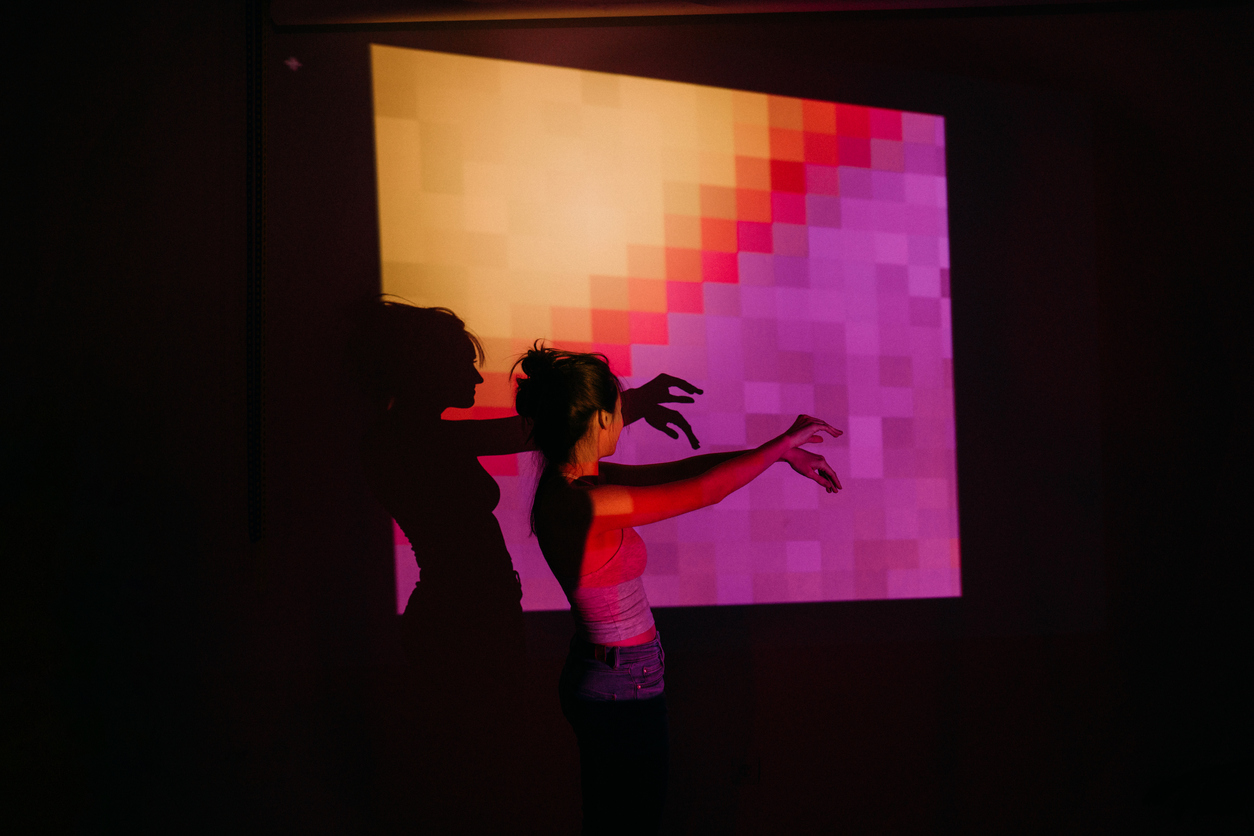
When setting up a photoshoot with a projector, you’ll need to think carefully about the projector’s height and angle, just like you would with any other light source. Projectors are considered a hard light source because they use a focused beam of light emanating from a small aperture. This means they can cast harsh shadows on your model. You can avoid this by finding a flattering height and angle.
Many photographers just set their projector on a table or chair beside the camera, or even directly on the floor. Low angles can work great if you want to project an image onto the background only without covering your model.
If you want to project the image onto your model as well, a low projector angle will create dark shadows on their face and on the wall behind them. This trick tends to have an attractive effect on subjects, and your images will look more professional if you can find a way to mount your projector higher than the model’s head. This can be problematic since most projectors and their mounting systems are designed to sit in place on a flat surface.
The ideal mount for a projector in a photoshoot would use a similar ball-head mechanism to the one on your camera’s tripod. An adjustable laptop plinth capable of screwing into a light stand or tripod can work well, especially if you can find one with a plate that can rotate on a single axis to at least a 90-degree angle. The single-axis rotation will allow you almost any horizontal or vertical angle imaginable, and a tall enough tripod will give you as much height as you need. You can attach your projector to your plinth with sturdy adjustable straps or even duct tape.
If you’re taking close-ups or headshots, you’ll only need a small white vertical surface or wall for the projected image. For small images, place your projector around 4 feet from your surface.
For full or medium shots, you’ll need a considerably larger white wall. Your projector should be at least 8 feet away from the wall for most full shots, so make sure both your vertical surface and the space in front of it are large enough to match your ambitions.
Once you’ve found your ideal height and angle, you’ll need to adjust your projector’s focus and perspective so the image doesn’t appear blurry or misshapen. The focus and keystone dials are located near the projector’s lens. Turn it on, and wait till the menu appears on the projector’s display and on your vertical surface. Start by adjusting the focus dial until the lines in the projection on your wall are crisp, and then move to the keystone dial to make any necessary perspective tweaks.
Now that you’ve achieved complete freedom of movement with your projector, you can get creative with your photoshoot. It’s easy to aim the projection so that it covers both your model and your background. It’s slightly more challenging to aim it so it covers the background but not the model or just the model and not the background.
3. Project an Image Behind the Model Only
You can use a projector in place of a green screen to make it look like you’re shooting in an exotic locale without leaving your studio or messing around in post. To achieve a live, adjustable green screen look in real-time, you’ll need to project your images behind your model without the image covering them.
Put your projector on the floor right between your model’s feet to get the best results for medium shots or close-ups. Full shots in this style can be tricky, but you can try placing your projector just out of frame beside the model on the floor or a low table. If you include the model’s feet, make sure your floor matches the ground in the projected image.
These shots work best when your subject’s look matches the projected image to create a cohesive picture. Make sure your model’s outfit and poses make sense in the setting suggested by your projected image or viewers will feel disconnected.
Although any image will technically work for your projector photoshoot background, the best images to use generally have some empty space where you can fit your model in the composition. Background images with too much going on will distract from your subject.
In many projector photoshoots where the projection falls on the background only, you’ll want to use an additional light source to light your model. Start by placing any additional light sources at more or less the same angle as your projector. Make sure that your additional lighting makes sense in the context of the background image and shines only on your model. If you shine extra light on your projected image, the image will look washed out. Take a few test shots and examine the cumulative effect of the lighting on your exposure to see if anything needs to be adjusted.
A good rule of thumb is to put any additional lighting as high as you can and at just enough distance from the model to soften the beam but not enough to diffuse it throughout the whole room. Make sure your model orients their poses toward the light source that falls on them rather than the light coming from the projector.
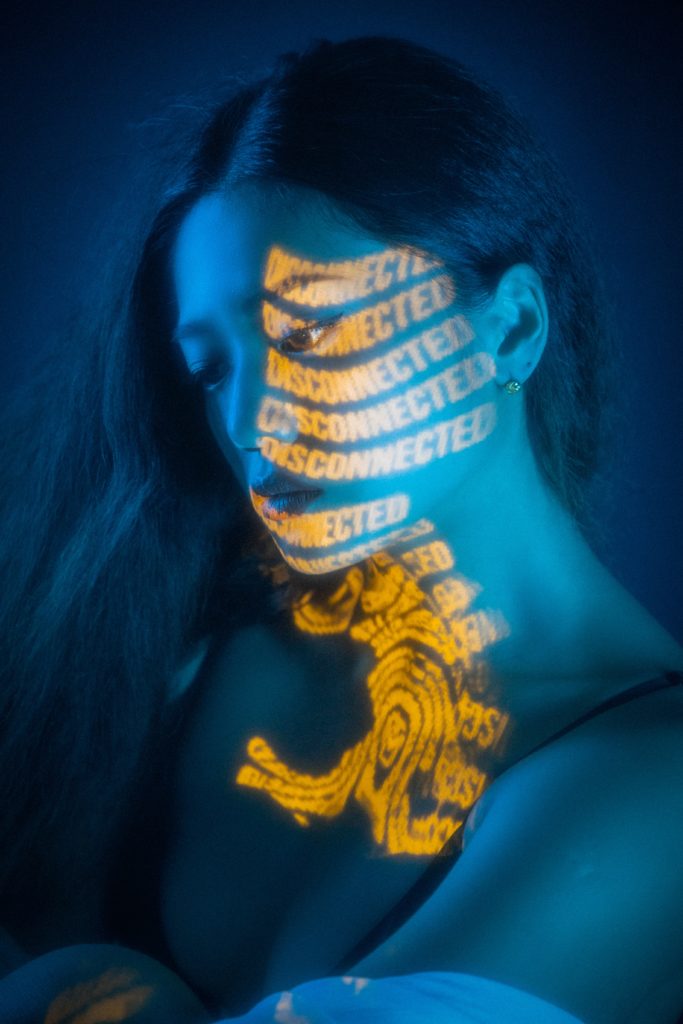
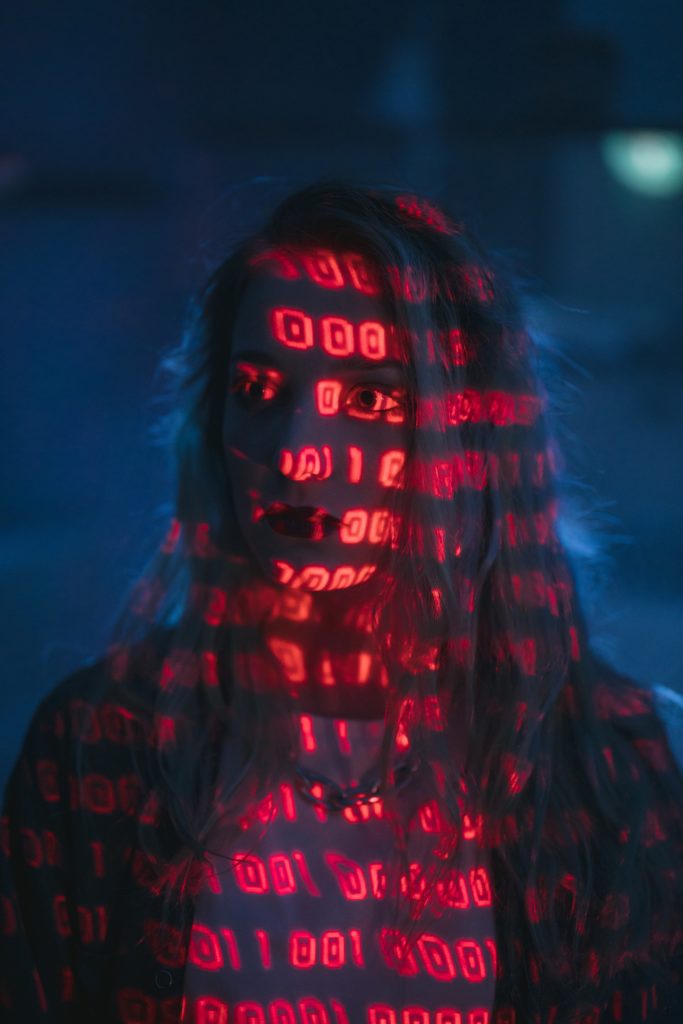
4. Project an Image on the Model and the Background


If you want to project an image onto your model and your background together, simple patterns and shapes are a good start for a stylish photoshoot with a projector. Play with 2D patterns on your model’s 3D skin to create distortions with a futuristic feel, or splash bold text across your scene that wraps around your model and spills out onto the wall behind them.
This style of projector photoshoot generally works best with a bright projected image in an otherwise completely dark room. Get your projector as close to your subject as you can without losing the full projection to make sure your image is as crisp as possible. For many projectors, the optimal distance is around 5 to 7 feet. In most cases, this will give you a bright enough projection to shoot with no other ambient room light using a fast shutter speed and a low ISO.
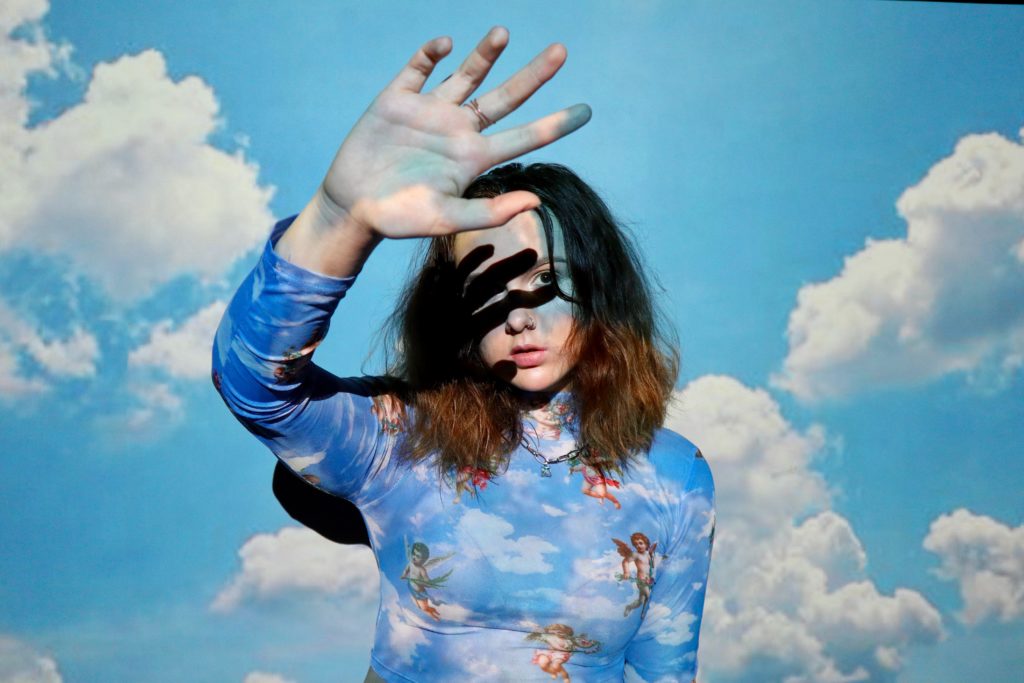
5. Project the Image on the Model Only
To project an image on your model only and feature a neutral background, just change the orientation of your camera to your subject. Place the projector directly in front of your model, and then take a few steps to either side so that the wall with the projected image behind them moves completely out of your camera’s field of view. A deep black background usually works well to contrast any bright images you project onto your model.
Besides simple shapes and patterns, colorful images of flowers or clouds also work well for this style. Try projecting an image of a mask onto your model’s face, or create a motion blur effect by projecting a slideshow of different images onto a completely still model and shooting with a slow shutter speed.
6. Creative Coloring
Some of the best projector photoshoot effects are the creative coloring techniques you can set up. If you have a projector displaying colored images and you also need to use another traditional light source like a flash or a strobe, you’ll need to compensate for the color temperature.
Many budget projector bulbs have a white balance that’s closer to tungsten than neutral. If you shine a completely white image onto a completely white wall, use color temperature orange (CTO) gel or an orange filter on your additional light source to make it easier for your camera’s white balance setting to compensate.
You can also compensate for the extra projector warmth by using a photo-editing app to add a little blue to the image you plan to project. This will help cancel out your bulb’s tungsten white balance and let you use a flash without a filter.
On the other hand, if your projection has a lot of cool blues, like a picture of the sky or the ocean, you might need to compensate with some color temperature blue (CTB) gel or a blue filter on your additional light source. Many high-end cameras today come with AI-powered auto white balance (AWB) settings that can almost work magic for most color temperatures. If you’re a perfectionist though, you might need to experiment with each projected image individually to find the right camera and flash settings.